
How to create System Dashboards
– These dashboards will be available to everyone unless restricted by security roles
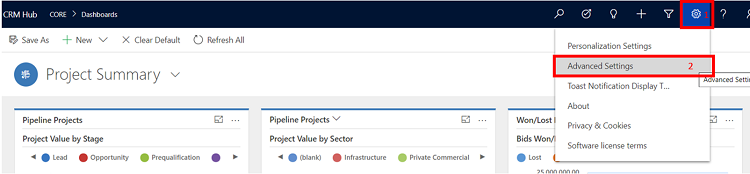
Navigate to the customisations by clicking the cog (1) selecting “Advanced Settings” (2) and then selecting Customizations (3).
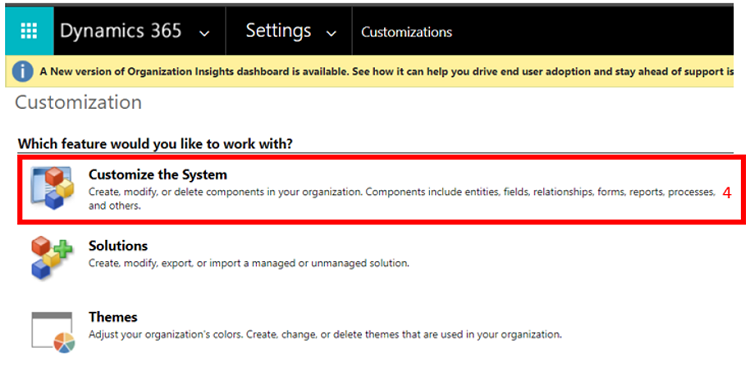
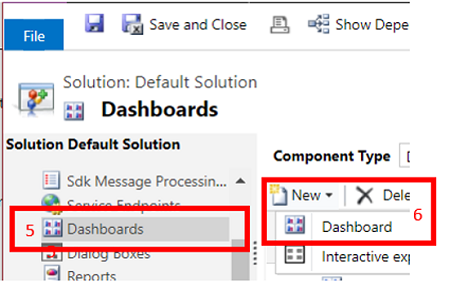
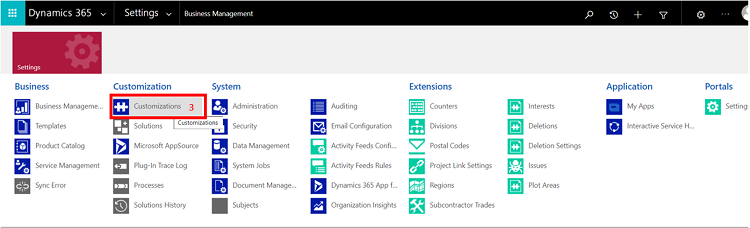
Select “Customize the System” (4), and then scroll down and select “Dashboards” (5) in the menu on the left-hand side. Select “New” and then Dashboard (6).
How to create Personal Dashboards – Dashboards only available to the person who created it and anyone they share it with
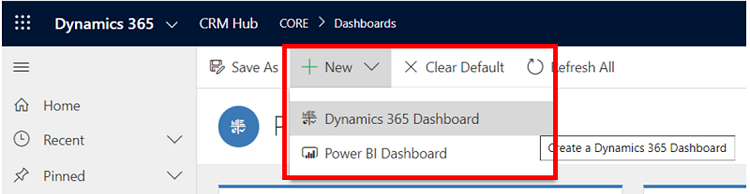
To create a Personal Dashboard
Select “New” from any dashboard and then click on “Dynamics 365 Dashboard”.
From this point on the two methods converge
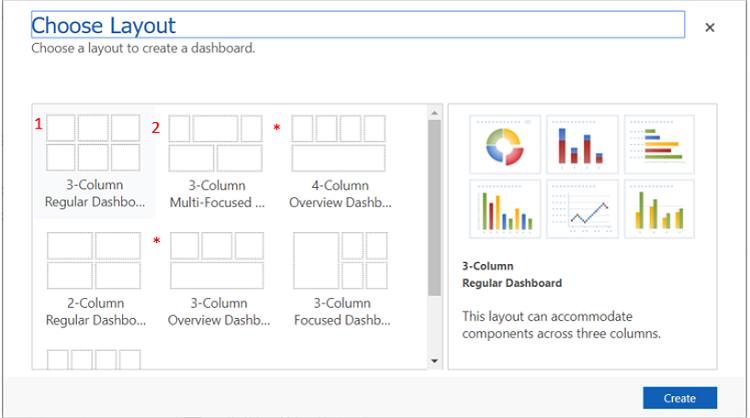
On this screen, select the layout template you wish to use.
There are a few different things to consider when selecting a dashboard layout. A key point is the division of the form. The layout marked 1 is divided into thirds whereas 2 is divided into quarters. Using 1 would mean you cannot split the page cleanly in half. The layouts marked with asterisks are split into tabs, allowing half to be collapsed and hidden.
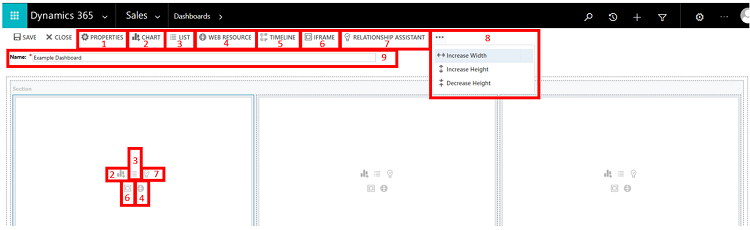
This is the main page used to design your new dashboard. Once you’ve named your dashboard (9), and decided whether your dashboard should be made available for mobiles (1), there are a number of different types of information you can display here. Selecting across the top bar will add new sections to the page, to a maximum of 7. Selecting within sections will add the area to that section:
2 – Charts can be added using this button. Several charts are already in the system, additional charts can be created in the “Charts” area on the right of any list page, or under any entity in the “Customization” area. Select the entity you wish to display a chart for, select the view from which the chart should be drawn, and finally select the chart you require.
3 – List components are used to display a view directly on the dashboard. This can be a personal or system view on personal dashboards, but can only be system views on a system dashboard. Personal Views can be created from any filtered list page or from the Advanced Find. System views are created under the respective entities in the “Customization” area. Select the entity and then the view you wish to display.
4 – Web resources are used to access add-ins and customisations. If you’re using this tutorial it’s very unlikely you’ll be using this type of panel.
5 – This is used to add an area which combines posts and activities into a timeline, and is only available in the Unified Interface.
6 – An Iframe can be used to show a separate web page within this page. This is achieved by providing the URL of the page you wish to reach. Functions with more complexity can be achieved through this with some programming wizardry.
7 – This allows you to host the “Relationship Assistant” on your dashboard, a machine learning based business intelligence which will attempt to predict what you should do next.
8 – These options only appear when you have a section selected, and allows you to change their width and height. This is limited by the decision earlier when choosing the layout.
# – once an area has been created, additional buttons include: “Edit Component”, “Remove”, and “Undo”.
Post Creation Options – System Dashboard

* – Always remember to publish your changes!
1 – Allows you to choose which Security Roles can use your newly created system dashboard.
2 – Allows you to set the selected dashboard as the default dashboard for the system.
3 – Functionally a copy button, select the dashboard you wish to copy, click save as and provide a different name.
Post Creation Options – Personal Dashboard
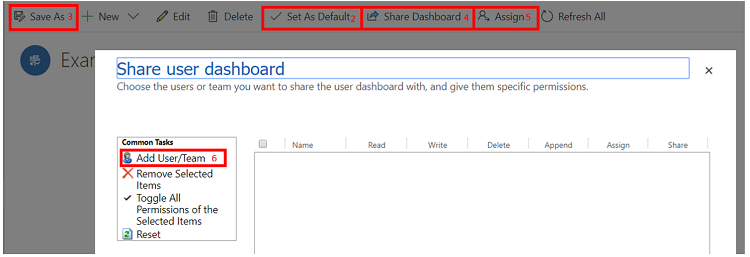
4 – This allows you to share your Personal Dashboard. Be away that you need to separately share any personal views included in your dashboard. Please see 6 for more detail on this process.
5 – Allows you to reassign ownership of your dashboard to another user.
6 – Allows you to select whomever you may wish to share your personal dashboard with. They will appear on the right, allowing you to decide what level of privilege individual users you have shared this view with have. The majority will only require “Read”, as this allows use of the dashboard but prevents any changes being made.
Jeremy Bamford – KMS Consultant
